Tuesday, June 29, 2010

Equivalent Exposure

This Tutorial is building on the last Tutorial. In my last tutorial, I told you I was asked by a member to help her with Equivalent Exposure, she said that she had read numerous articles and that she was not 100 percent sure how it all worked.

I am making this tutorial in hopes that all of you may have a better understanding of "Equivalent Exposure" and how you may want use it by switching your camera mode from "Auto" to "Manual." When you start shooting in manual you will be able to unleash the creative beast inside you. (Your camera's "Program or Auto Mode", has no idea what you shooting style is or how you want to use the actual image you are trying to create, that is why it is important as an artist to create your own work, not just let your camera capture a scene.)

"Equivalent Exposure" in short, is saying that there is more than one way to climb a tree.
I am going to show you how it works with some diagrams, and then I am going to have you get your camera out of the bag;
as well as go outside and play with me for a little while.
I promise if you do this lesson with me, you will walk away with a better understanding of "Equivalent Exposure" and why it is important as an artist to have this creative knowledge.

*In our last tutorial you learned how to make a "Proper Exposure" for a given subject.
**You know how to read the light meter and know what the "Meter Exposure Indicator" is telling you as you are looking through the view finder.

Lets look at a simple exposure on an illustration I made, It shows you the "Marriage" of the proper exposure. In this Diagram you have all three elements of a proper exposure, Shutter Speed, F-Stop, and ISO.
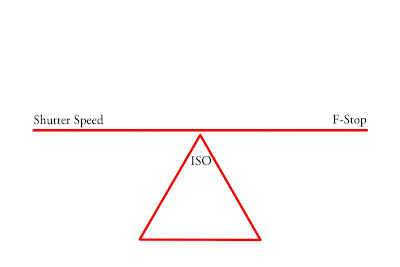
Now the fun part, "Equivalent Exposure". Equivalent Exposure in simple terms, means that you can change the several settings, ie the Shutter Speed, F-Stop, or ISO and still have the "Proper Exposure" for the same scene. I want you to take note that in the diagram I made, the Shutter Speed and the F-Stop are on what appears to be a see-saw.. I did this on purpose.

If the Shutter Speed Goes Up, the F-Stop should go down, by doing this you are still going to have a Proper Exposure.
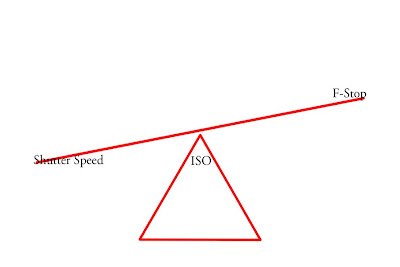
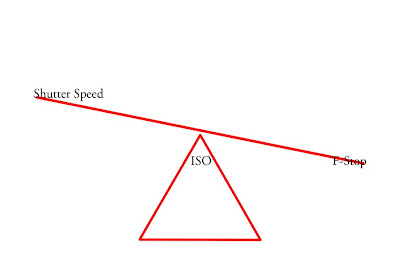

Now lets add some real life numbers in this illustration so you have a better grasp of how the see-saw works with the numbers inside your camera.

I have done this illustration with a typical Bright Cloudy Day, IE, clouds are up, but not so thick its going to start hailing on us. Just a smooth light from the soft filtered clouds.
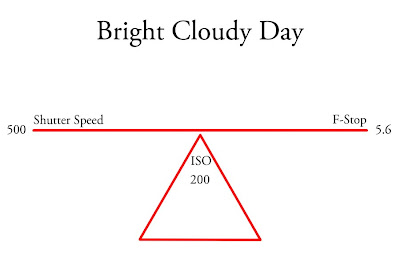


This is a typical setting the camera may pick for you in full auto mode.
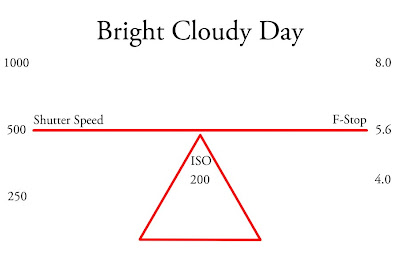


In the following illustrations I am adding two more options that will give you a "Proper Exposure"
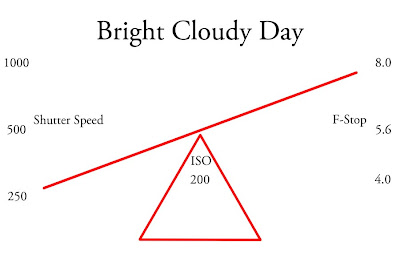
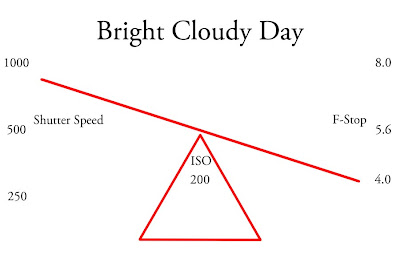

These last two images show you how the see-saw works. If one side goes up, the other side goes down.


**Hands on part of the tutorial.

****1. Go get your camera out of the bag and go out side for a while. Here is where it is going to start clicking for you.. (Notice I said Clicking.. heheh I crack myself up sometimes.. ehehehhe)

2. Go outside and pick out something stationary like a fence row, a side of a building, a row of cars, or anything with some repetition involved.

3. Put your camera in Manual mode and open your F-stop to as wide as your lens will go, Mine is F2.8 so that is where we will start in my example images.

(SIDE NOTE: I also put my camera on a tripod for this illustration to give you a better idea of how this all works. You will see that the first couple of images have a very shallow depth of field and as we move through the scale it will become a larger depth of field.)

4. Focus on something close to your lens, like the start of the fence, and make sure you can still see the other part of the fence in your view finder, (It should be going away from you.) (If I lost you look at the pictures below for a better example of what I am asking you to do and focus on.)

5. You have the front of the fence in focus, F-Stop as wide open as your lens allows, now adjust your shutter speed until the Exposure Level Indicator in your camera says that the images is a "Proper Exposure." Now click the shutter to capture the image.

6. Next, roll your F-Stop wheel three clicks to the right, and the shutter speed three clicks to the left. (Remember the see-saw image, if one goes up the other must go down.)(3 clicks is one full F-Stop)

7. Do this until you get to the smallest F-stop your lens has. (Mine stopped at F22)

I have included examples of the 7 steps below, I have also listed the Shutter Speeds and F-Stops along with the ISO of every image taken for this tutorial. Again, I placed my camera on a tripod so you know I was not moving my camera. I want you to see how the F-stop affects your Depth of Field.


As you look through your images you will see that the "Wide Open" F-Stop or Aperture has a very shallow depth of field. I think I focused on the Second Full Picket of the fence, it is in focus and almost all the other pickets are from soft to out of focus,.

As you look towards the center, there is more of the fence in focus and at F22 A good portion, if not all of the fence is in focus.

These 8 Images have an "Equivalent Exposure", They Are all Properly Exposed and the only real difference from them all is the Depth of Field.

This is a good spot to ask me why it would matter.?

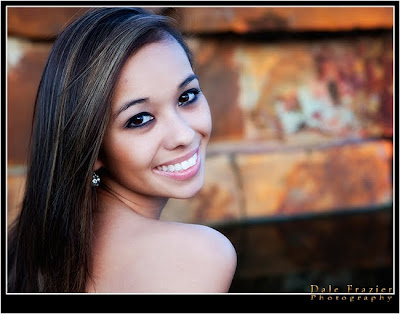
I am glad you asked, Lets Say for example your assigned a photography session with a beautiful young model.
You decide to have the session outside. You want the entire image to concentrate on her beauty and you don't want a dork in the background making rabit ears. behind his buddy who has somehow seen you and wants to be in the picture now. (Trust me this happens.)

Open your F-Stop up to get a shallow depth of field just like our starting point was in this tutorial.
Now focus on your subject and capture the image.

It should look something like this. (Image Captured in front of Bass Pro Shops, in Oklahoma City)


Next Question, I don't like photographing people I am more of a Nature Photographer, how will that make a difference for me?

Ok do the same thing but pic out a flower for your test shot, using the same setting we talked about above for the glamor model.
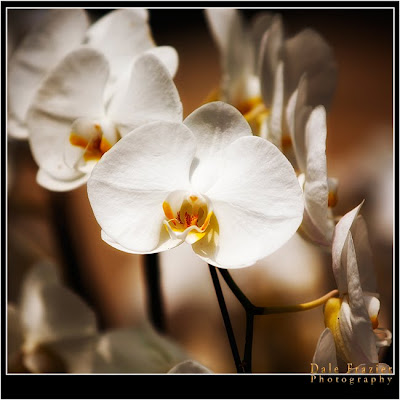
Notice how the back ground is a nice smooth blur, no distractions in the back ground. The background creates a gentle back drop for the subject, and you cant hlep but to focus your attention to the subject, in this case an Orchid. (Image captured in Okinawa Japan)


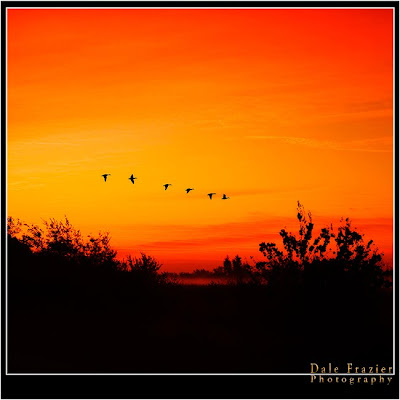
Next I wanted to show an image with a kind of middle of the road depth of field and I pulled out one from this past fall.

It is a Sunrise and the ducks flew by right as I was getting the scene in focus, very lucky on my part.


For this next image, I want to take you back to the tutorial I did entitled "Focusing Tips"

I told you that as a general rule for hand held focus, keep your shutter speed at least as high as the number in mm as your lens is, IE a 400mm Lens, you will want your Shutter Speed to be at least 400.

Now, For those of you who actually went outside and did this tutorial, did you notice as you got to F16 or F22, your shutter speed was almost too slow to hand hold..?
I did, that's another reason I put my camera on a tripod, If you notice in the example of my F22 shot, My shutter speed is at 1/20, and my lens in a 70mm. Had my camera been handheld, the image may well be blurry.

I will address the ISO Question right here before we move on. Remember there are three elements to a proper exposure, so far we have looked at 2, Shutter Speed and F-Stop. If the camera shutter speed is too slow to handhold, you could bump the ISO up to gather more light. Since the ISO I was Shooting was 200, if I moved the ISO up to 400, I could now shoot with a shutter speed of 1/40 in stead of 1/20, remember the amount of light doubles for every full stop.

Why would you ever want your shutter speed that slow then you might ask..?
I am glad you asked,
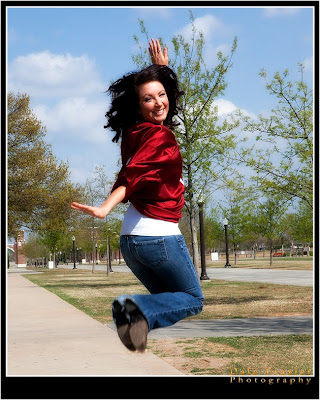
If you are trying to Show Motion in a image and you have a fast shutter speed, you may well have a cool shot with a girl up in the air.


What is you are wanting to show how beautiful the beach really was.?

On this image, I had my Shutter Speed set on 5 Full Seconds. The ocean was rolling in nice and slow, had I used a faster shutter speed, I don't think the beauty would have been captured as serene as this image is. (camera was on a tripod to keep it steady.)

One more quick question, you at the river on a full sunny day, you want to blur the river, but you cannot get your shutter speed down to a full second or even more time to blur the water with out over exposing the image. Look at your camera manual, some of the Canon Cameras have the option to expand the ISO, Search for ISO Expansion in your manual. It will allow you to go to ISO 50, that will give you more time. (I am not going to go into filters in this tutorial, it is off topic, but look for more down the road.)

After reading this, I hope you have actually gone out to try the techniques that have been discussed in this tutorial. If you are new to Manual Mode, I hope that this has been helpful as well as motivating you to go out and shoot some more in manual mode.

I will probley write a short tutorial on the AV and TV modes in a few more days; But for now, I would like for you to go out and shoot some more in manual.

I am also hoping that you now have a better grasp on "Equivalent Exposure," and what that term means.

Enjoy your weekend, Go out and shoot in manual and upload some more fantastic works to our group.

Again a quick reminder, I do not have a staff or secretary who will double check my work, spelling etc, do if you see a mistake, shoot me a note and I will fix it.

As always, Thank you for your comments.
Dale

Manual Mode Made Easy


As I mentioned in one of my last tutorials, this tutorial was made for the Canon User Group and I thought I would go ahead and share these tutorials with you as well. I hope you find them helpful and comments are appreciated. Thanks for taking the time to visit my blog.

Tutorial: Manual Mode Made Easy.

I was asked the question the other day by one of our members. The Member was needing some help with "equivalent exposure." I told the member I would work on putting a tutorial together to help explain equivalent exposure.

(As you read this tutorial "Normal Exposure" and or "Proper Exposure" mean the same thing.)

The more I thought about it, I decided that a tutorial on Manual Exposure would probably be the best place to start. I know that we have a lot of members in our group, some more experienced than others. I decided to make this tutorial so that those of you who are not shooting in Manual Mode, may See the benefits of this creative style of shooting, as well as show you that is not as hard to do as some of you may perceive it to be.

OK now here comes the fun Part, If you are reading this tutorial, I will guess that you may well have a desire to shoot in Manual Mode. Get your camera out of its bag and follow along.

On your Shooting Mode Dial, put your camera in Manual Mode.
Look through your view finder, as you are looking through your viewfinder, push your shutter button half way done to power up the camera, just the same as if you were trying to focus your camera.

Note: This tutorial is based on Canon Cameras, Your camera may have a different layout on the numbers, but the basic idea will be the same.

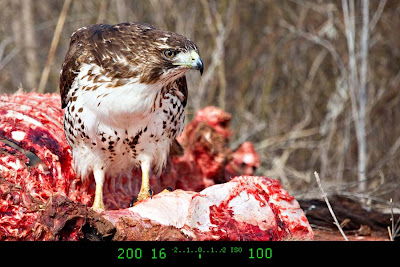
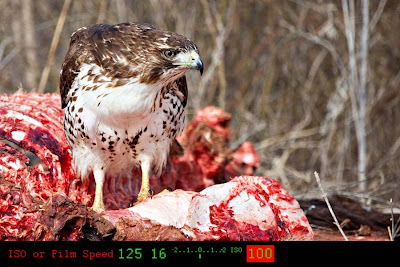
I want to draw your attention to the numbers going across the bottom of your focusing screen, as you are looking through your view finder.

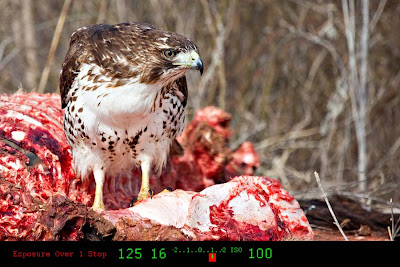
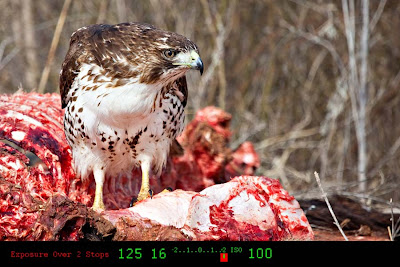
At the bottom of your view finder you should see some numbers in a sequence, something like this image above. (For right now, don't pay as much attentions to the actual numbers as the numbers themselves.)


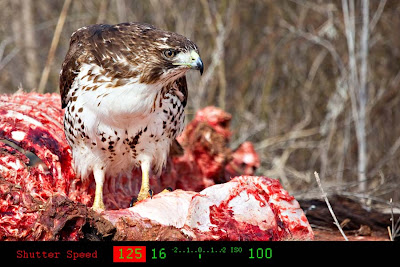
The first number you will see is the shutter speed. It tells you what you have your shutter speed set on. (note it is highlighted in red.) The 125 means 1/125th of a sec Shutter Speed. That is the amount of time your shutter will be open allowing light in your camera for your sensor to record the image.


The next set of numbers is your F-Stop. The F-stop is the number highlighted in red. The 16 means the Camera is Set at F 16; I used F 16 since we just did a tutorial on the "Sunny 16 Rule."


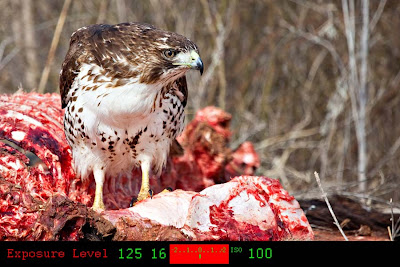
The next set of numbers and dashes is your exposure meter.


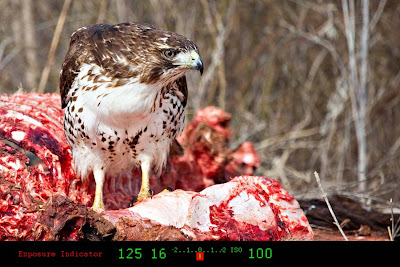
In under the Exposure Level you will find the "Exposure Level Indicator."
**This is the one tool in your bucket that will help you the most when shooting in manual.
It is a tool to assist you in your creativity.
**I want you to keep and Eye on your Exposure Indicator.
I will come back to this tool in a sec after we go across all the numbers on the bottom of your view finder.


The next set of numbers is the ISO. This means that this illustration the camera is set at ISO 100.
Back when we were shooting Film, this was referred to film speed.
**I have no plans to go into what "ISO" "ASA" is for this tutorial, if you would like you can google the terms, and most of you at this point are at the very least familiar with film speed and the pro's and con's to both. (You may see another tutorial from me on Film Speed I guess.?)

**Side Note: I did not make a slide on any other numbers or symbols you may see on the bottom of your camera.
IE the Flash, Burst Rate, etc. I am writing this tutorial on shooting in manual mode and trying to keep it simple.


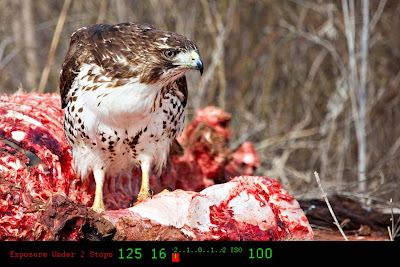
Remember the Exposure Level Indicator I was talking about. This image shows the exposure level to be "2 stops Under Exposed" That means if I clicked the shutter button, This image would be dark to too dark.


I want to draw your attention back to the scale for a second on this Illustration.
If the "Exposure Level Indicator" was blinking in stead of remaining solid, it would indicate that the image is more than 2 stops below Proper Exposure.
IE if it is blinking, your camera is trying to tell you, HOLD UP, SOMETHING IS DEFINITELY WRONG HERE, MAKE SOME ADJUSTMENTS, THIS IMAGE IS GOING TO BE SO DARK YOU WONT BE ABLE TO TELL WHAT IT WAS..!!! BLINKING MEANS, FIX ME..


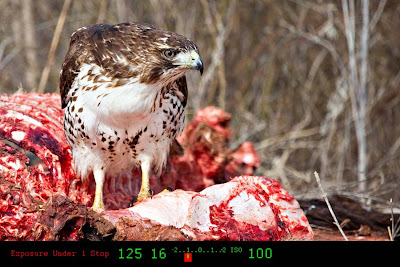
This Illustration shows the "Exposure Level Indicator" as "1 Stop Under Exposed".


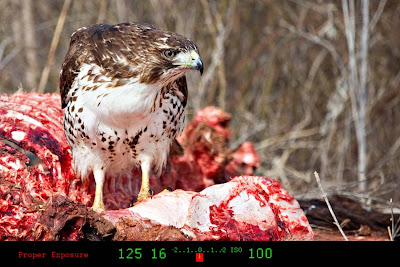
This Illustration shows the "Exposure Level Indicator" to be set at "Normal or Proper Exposure."


This Illustration shows the "Exposure Level Indicator" as "1 Stop Over Exposed." This means the image will be bright.


This Illustration shows the "Exposure Level Indicator" to be "2 Stops Over Exposed" The image will be very bright.

*** The same is true on this side of the scale as well, "if the Exposure Level Indicator is blinking," your camera is yelling at you to make some adjustments, or you will have an image so over exposed you will not be able to tell what it was.


Now that you have a good grasp of how the "Exposure Level Indicator" inside your camera works, and what you are looking at with the exposure scale, you have 3 options for making adjustments to get your "Exposure Level Indicator" to the spot in the scale that will make a Properly Exposed image.

We are going to concentrate on 2 of the 3 for right now.


The first one I am going to go over with you is adjusting your shutter speed.
If you were looking through your view finder and your see your Exposure Level Indicator to the left, like it is on this illustration.
You will roll the shutter speed dial, (the one right behind your shutter button) to the left 3 clicks.
Why three clicks you might ask?
Your camera came from the factory set on 1/3 stop adjustments.
This tutorial will be talking about adjustments in 1/3 stops as well.
(Side note: You will also notice there are 2 dots between the numbers on the scale, because it is set on 1/3 adjustments.)

In this Illustration, your Exposure Level Indicator shows the image will be "Properly Exposed" you will not need to make any more adjustments for a Proper Exposure.


In this illustration your Exposure Level Indicator shows the image to be one stop Over Exposed so you will roll your Shutter Button to the right 3 clicks.


In this Illustration your Exposure Level Indicator shows the image will be 2 stops Over Exposed so you will roll your Shutter Button to the right 6 clicks.


Now the Second way to make adjustments to your camera for proper exposure is to adjust your F-Stop.


Same Illustration as previously used is this one with the Exposure Level Indicator showing the image is 1 stop Under exposed. To change your F-Stop you will roll the dial on the back of your camera, to the left 3 clicks.


Same Illustration as previously used with the Exposure Level Indicator showing the image is 1 stop Over Exposed, roll the F-Stop adjustment wheel to the right 3 clicks to bring it back to Proper Exposure.


***In this tutorial, I am simply trying to get you to understand How your meter in your camera works and how to make adjustments in manual mode. The Following tutorial on Equivalent Exposure will explain in more detail why you may want to change either the Shutter Speed or the F-Stop Depending on the image you are going to artistically create.

***HUGE NOTE: When I was making this tutorial I started to show the image in the view finder as under exposed, properly exposed, over exposed as it would look if you took the shot as the meter was indicating. But the simply fact is, when you are looking through your view finder, your camera is not going to show you by the image you can see if it is properly exposed or not, it just lets you see the image as it is, and the Exposure Level Indicator shows you if it is under exposed, properly exposed, or over exposed, just like the illustrations I have added. Maybe sometime before I am long gone the camera makers will have some sort of fancy preview button that will show you what the image will look like, as you are looking through the view finder, but for now they don't.

ANOTHER NOTE: I a fully aware, that the numbers listed on the bottom of the illustrations are all the same. I am not trying to confuse anyone about the numbers at this point. I am simply drawing your attention to the Exposure Level Indicator and what to look for when shooting in manual mode. At this point we are just breaking ground in shooting in Manual Mode and Not trying to muddy the waters with the pro's and Con's of the actual numbers and what they mean.

I debated this last illustration for a while, as to add it to the tutorial or not. After a long debate I decided to add it so you will have the information if you want it.

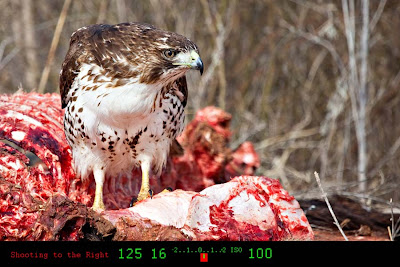
Have you ever heard a photographer say "shoot to the right" or I am going to "Shoot this to the Right"
Here is what they are talking about.

Additional Tip: Shooting to the Right.


Notice the Exposure Level Indicator is One dot to the right of "Properly Exposed." You might ask your self why you would want to shoot to the right. Well it comes from a combination of Canon equipment and Photoshop editing. If you have done very much editing in photoshop, you know that if you have a dark image and you want to make it brighter you are going to "add" a lot of noise to the image. If you are trying to make it a lot Brighter because it was too under exposed, then you will be "adding" a ton of noise to the image.

Why shoot to the right.? When you are in Photoshop, you can bring the brightness down with out adding noise to your image. So in short, you can take a slightly bright image, bring it back to normal and not be adding any noise to your image.

Again, this tutorial is for Shooting in manual, I will not go into all the pro's and con's of "shooting to the right" but you at least have some more knowledge and you can decide if you want to try it or not.

Lastly The 3rd Adjustment you can make to your "Marriage" of the "Proper Exposure" is the ISO or Film Speed. I am going to just give you some really basic information on the Film Speed and How and Why you may want to use it for this tutorial on Shooting in Manual Mode.

As a general rule, your Film Speed (ISO) has been given a number that tells how fast it can record light. The less light your scene has the Higher the Number your Film Speed will need to be. Here is some basic ISO guidelines.

OUTSIDE Bright Sun ISO 100
OUTSIDE Shade ISO 200
INDOOR Bright Lights ISO 400
INDOOR Med Lights ISO 640-800
INDOOR Low Light ISO 800+

Again, to keep from muddying the waters, these are some general guidelines for a starting point on setting your ISO. We may well need a tutorial on ISO and I may do that in the future, but for now, this is a close point to start and why you may need to change the ISO on your camera when shooting in Manual Mode.

I hope that this tutorial has been helpful as well as easy to understand. I also do not have a secretary who is reviewing my work so if I have made a typo or something you can send me a note and I will correct it. Thanks for any feedback you may have and I hope this tutorial will be of some use for some of you out there.

Dale
Dale Frazier Photography.

Sunny 16 Rules

Photography Tutorial: Sunny 16 Rule

I don't know how many of you have ever heard of the SUNNY 16 Rule, but in short this was the guide for film photographers for years and it was a guide in the field a photographer could use with out a light meter. It is based on incident light in stead of reflective light. Most meters in your camera read reflective light, not the incident light. I would even go as far to say it may well be about 98% accurate.

The Rule is Simple and applies to Bright Sunny Days, IE the days you need your sunglasses, not just wear them to add to your stylish looks.

Shooting in Manual Mode in Direct Sunlight.

Put your F-Stop on F16, Keep in mind the focusing tips given a couple of weeks ago (the general shutter speed need to be the same as your lens or faster.) You will make your shutter speed 1/100 for a 100 mm lens. Then set your ISO to match, IE ISO 100. Your image will be properly exposed.

You will match your shutter speed and ISO with the F-Stop always on F16.

On a sunny day and with ISO 100 set to 100, set the aperture to f/16 and the shutter speed to 1/100 or 1/125 second (on most cameras 1/125 second is the available setting nearest to 1/100 second).

On a sunny day with ISO set to 200, set the aperture at f/16, set shutter speed to 1/200 or 1/250.

On a sunny day with ISO set to 400, set the aperture at f/16, set shutter speed to 1/400 or 1/500.

If you get time try it and see how well it works for your.

I hope you enjoyed this tip.
Dale

Revision to the Blog, I was asked by a couple to show some examples of the Rule being used., Here they are.

OK, it started out with an overcast today, But it cleared off and I was able to take three examples today.

These are all three using a 400mm Lens, so I set the camera to Manual Mode,

ISO 400
Shutter Speed 400
F16 (Remember it is the Sunny 16 Rule)

Focusing Tips

For those of you who don't Know I am a co-founder for a group on deviant art called Canon Users.
This group was founded as a 2 part process. One being a place to share photos with other Canon Users and the other a place to share tips etc.

I have been asked by numerous questions by members. I thought I would go ahead and start sharing my tutorials I have made for the group on my personal blog as well. If you are a Canon Shooter and would like to be a part of the Canon User Group, here is a link to that Group found on Deviant Art. Canon User Group

Tutorial: Focusing Tips

We have recently experienced an abundance of submissions that are out of focus. Knowing that we allow almost every level of photographers in our group, I thought it might be a good Idea to make a short and sweet tip sheet about focusing.

I am going to skip over manual focus for this set of tips, I figure if you are actually taking advantage of your manual focus, you more than likely know what you are doing.

Starting with holding your camera. If you watch T.V. at all you have seen many people hold the camera in many different ways, and many different styles. My goal here is to give you some general Ideas.

Take your neck strap off your neck. Put your feet shoulder width apart for a good stance. Holding your camera with both hands, (firm, but not squeezing the life out of it,) (your right hand on the camera body so you can work the controls, the other at the base of your camera and or the the left side of the camera body and or the barrel of your lens pending on your lens length. Bending your arms at your elbows, bring the camera up to your face so you can see through the view finder.

As you look through the view finder, you can squeeze your elbows next to your body for even more stability. If you are in a sitting position, you can put your elbows on your knees, and or lay flat and use your elbows on the ground for even more stability.

Control your breathing, you will want to hold your breath as you shoot for that one hundredth of a second or so. You will also want to "follow through." Think of it as shooting at a target, you do not want to move your bow until the arrow has hit the apple, same with your camera, you do not want to move your camera until the image has been captured.

Focal points are found on most DSLR's. From the Rebel to present, you will have several focal points inside your focusing screen. (read your manual to find how to change the point from the center to the point you need) If you cannot find your camera manual canon offers downloads on most camera manuals at this link [link]

It is pretty easy, put the focusing point on your subject and hold your camera shutter button half way down and then after you have the conformation that the subject is in focus, squeeze the button, not jerk the button.

One of the most common mistakes happens when you want to recompose the shot. To avoid this mistake, look at the top of your camera and make sure you are on "ONE SHOT" not "AI FOCUS" or "AI SERVO" these are for moving subjects, this tip sheet is for stationary subjects.

Once you have the main subject in focus and still holding the shutter button half way down, and focus has been made, you can recompose your shot, the camera will stay focused on what you "locked" focus on, (as long as you don't let the shutter button back up.) When I say recompose, I am talking about moving your camera slightly for composition, ie rule of thirds or what ever rule you are wanting to use or not use. DON'T WALK AROUND, THE FOCUS WILL NOT BE RIGHT.

With the focal point discussion, a general rule of thumb for anything with eyes, focus on the eyes, your camera will pick up the eyes because the live eye has a natural amount of reflectiveness. If you are shooting really close to the subject, focus on the eye closest to the camera, it will help the image look like it is in focus.

Tip: As a good general rule of thumb when you are shooting hand held you will want your shutter speed to be at least as fast as your lens focal length. I.E. if you are shooting with a canon 200mm zoom, you will want your shutter speed to be at least as fast as 1/200 for hand holding. Obviously if your shutter speed is faster, it will be better with in reason.

Next Tip: If you cannot get the shutter speed up high enough, then you will want to mount your camera on a tripod or mono pod. If you plan to take your photography to the next level, you at some point will want to invest in a tripod and or a mono pod pending your shooting style. I good tripod will help ensure that your camera will not move as much as if you were hand holding your camera under low lighting conditions. No money, I understand, use whatever you can to help hold your camera steady, use a tree, put your camera on a large rock, picnic table, or what ever else you can use to help steady your camera. If you are using the IS lens, don't rely on it solely. It was designed to help, not fix all.

I am not going to go into the long exposure times, and other things to consider when shooting in bulb or lengthy shutter times for artistic creativity, I figure if you are doing that you are already familiar with those things to consider. These tips are basic and I will keep this tip sheet basic.

I hope that these tips will help some of you.

Now get up off the couch and go and do some shooting, don't wait for your family pet to walk up to you, go out and shoot and have fun with your camera, after all that is why you have it. Shooting regularly will do two things for you. It will help you know your camera to the point you do not have to look down to make changes, and it will make you a better photographer. The more you shoot the better you will be.

Have fun.
Dale